Home → The Classics → Farai's Codelab
Making My Senior Project Virtual Jo: The Handy MCSP Helper
Published:
For my project-based senior CS class, I made Virtual Jo: The Handy MCSP Helper. Virtual Jo was supposed to be a voice assistant which would provide students with information on college courses and cafeteria menu information. There were other features, but I couldn’t start working on them.
While I didn’t implement all the features I had hoped to, I’m still proud of what I made. I went from something I had no understanding of whatsoever to something functional; functional enough to show it off at the college STEM fair and get positive feedback. I then showed it off on all my resumes and portfolios as my best work yet, which isn’t very good if I’m honest.
In this post, I’ll go over how I made it and what I felt about it. I’ve written about this before in some older blog posts:
I also made some videos about it, but I deleted them for some silly reason. This also goes for some of the supporting documents I made at the time.
How I Made It
Finding an Idea
During the Christmas break before the project class, my professor asked us to look project ideas. While early, thinking ahead would allow us to start right at the beginning of the semester. He even gave us some suggestions on what to do.
Since I’m such a diligent student, I didn’t do that, opting to use the break to take a break instead. Right before the first class, I suddenly came with an idea to share based on one of his suggestions. He was looking for someone to make an assistant using the Google Home. Since I had a Google Home Mini and an Echo Dot1, the latter I used to make a (not so great) Alexa App, I went with it. My initial idea was to make a voice-controlled input which would run voice commands on a computer, such as running scripts in a terminal.
That turned out to be ridiculously hard and not very useful. Instead, I decided to make a voice assistant which would provide course information and cafeteria menus. I also wanted to make something to help students study for tests as well as answering frequently asked questions, but I ran out of time before I could even start planning those features.
Getting Started
With my idea I was ready to start… learning about how voice UIs work, which I did by reading a couple of books. One of those books had an emoji in it. Worst thing I’ve ever read.
Well not really2, but after two weeks I realized that my “learning” was an excuse to procrastinate, avoiding the hard stuff. I decided to cut it out and just start, which I did by working on scraping the cafeteria menu.
Cafeteria Menu
Providing information on the cafeteria menu took a bit of work. There wasn’t an API, so I looked to web scraping. The cafeteria’s menu is a simple webpage which does what it’s supposed to do. It uses two iframes, one with a calendar and another with the menu for the chosen day. I’m always impressed seeing iframes used this in The Year of Our Lord 2020.

Having found the code responsible for rendering the day’s menu, it’s time to understand the HTML syntax to see how it works. It’s a mess. Look at this:
<html>
<head>
    <title>Daily Menu</title>
    <style>
        body {
            background: #f9f9f9;
            font-family: Arial, Helvetica, sans-serif;
        }
        /* Smartphones (portrait and landscape) ----------- */

        @media only screen and (min-device-width: 320px) and (max-device-width: 480px) {
            * {
                font-size: 48px;
                font-family: Arial, Helvetica, sans-serif;
            }
        }
    </style>
</head>

<body onLoad="focus()">

    <I>Friday April 10, 2020</I>
    <font size=-1><P><B>Note: </B>Good Friday Holiday<br><li>All Dining locations closed<P><b>Breakfast</b><ul>Friday Non-perishable Lunch & Dinner<br><br>Pick-up in Mensa Thursday.</ul><P><b>Lunch</b><ul>TAKE OUT SACK MEAL #1<br><br>Microwavable Kraft Macaroni & Cheese (2)<br>Baby Carrots & Celery Sticks<br>Ranch Dressing<br>Autin's Crackers / Peanut Butter<br>Skittles<br>Dried Fruit & Nut Mix<br>Quaker Chewy Granola Bar (2)<br>White or Chocolate Milk</ul><P><b>Dinner</b><ul>TAKE OUT SACK MEAL #2<br><br>PB & J Sandwich (Bread/PB/J)<br>Gardetto's<br>Banana<br>Pudding Cup<br>Cereal<br>Dilly Bites<br>Monster Cookie Bar<br>Capri Sun Pouch<br>Bottled Water or Orange Juice</ul></font>
    </center>
    </table>
</body>
</html>
It works, sure, but it made me realize the importance of well structured, semantic HTML. It helps computers understand it which helps with accessibility and web scrapers, like me! Thankfully, HTML is very forgiving; even Internet Explorer renders it properly. As much as a mess the code is, it works!
Sadly, the poorly structured HTML made my work much harder. I even planned on using machine learning to try and read the menu for me. Thankfully, I discovered that the HTML was irregular in a very regular way.
The ugly mess of code usually looks like this:
<I>Saturday November 9, 2019</I>
<font size=-1>
<P><b>Breakfast</b>
    <ul>
        <li>Design your own Omelet</li>
        <li>Hard Boiled Eggs</li>
        <li>Cereal Bar</li>
        <li>Blueberry Muffins</li>
        <li>Belgian Waffles & Toppings</li>
        <li>Fruit & Yogurt Bar</li>
    </ul>
<P><b>Lunch</b>
    <ul>
        <li>Chicken Corn Chowder</li>
        <li>Shredded BBQ Beef Sandwich</li>
        <li>Potato Chips</li>
        <li>Malibu Blend Vegetables</li>
        <li>Vegetarian Portobello Wrap</li>
        <li>Grilled PB & J Sandwich</li>
        <li>Fries</li>
        <li>Salad Bar</li>
        <li>Deli</li>
        <li>Pasta Court / Sweet Potato / White Rice</li>
        <li>Pizza Court</li>
        <li>Taco Bar with Guacamole</li>
        <li>Chocolate Candy Cheerio Bars</li>
    </ul>
<P><b>Dinner</b>
    <ul>
        <li>Italian Vegetable Soup</li>
        <li>Anniversary Chicken</li>
        <li>Wild Rice</li>
        <li>Sliced Carrots</li>
        <li>Vegan Spaghetti Ala Puttanesca</li>
        <li>Burger Bar</li>
        <li>Fries</li>
        <li>Salad Bar & Deli</li>
        <li>Pasta Court / Sweet Potato / White Rice</li>
        <li>Pizza Court</li>
        <li>Sopapilla Cheesecake (RFH '11)</li>
    </ul>
</font>
Notice how the meals are specified under a <P><b>...<b> tag which is right before a ul containing the food for that meal. All of this is enclosed in a <font> tag, which is long obsolete3. Using an HTML parser like cheerio, I can attempt to parse the menu for a day like this:
// full code in https://github.com/faraixyz/virtual-jo/blob/7f22db4bbd5ec49abb3c3ad6f86838c78828f051/get_meals/meals.js
function parseMeals(html, date) {
    let meals = [];
    let $ = cheerio.load(html);
    // font is where all the menu information is heald
    $("font").children().each((i, elem) => {
        switch (elem.name) {
            case "p":
                // This gets the name of the meal and creates a meal object
                let mealObj = new Meal(getMealName(elem), date);
                meals.push(mealObj);
                break;
            case "ul":
                /*
                 * this ensures the right meal items are added.
                 * assuming that the meal title is followed by the
                 * menu's items, the meal index calculates the title.
                */
                let mealIndex = (i-1)/2;
                addMenuItems(meals[mealIndex].items, elem);
                break;
            default:
                console.log("That's not good");
        }
    });

    return meals;
}
The function takes the menu’s HTML and date and returns an array of Meal objects with the name, date and menu items. It works by looping through all the font element’s children. If the element is a <p>, a menu object is created using the meal name in the <p> tag. If it’s a <ul> tag, that indicates the menu for a meal. We get the right meal by looking at the element right before it.
While this code works most of the time, it’s unreliable given how unpredictable the webpage’s structure is. To mitigate this, I handled possible failures in the code responsible for the intent, which looks like this.
exports.handleGetMenuIntent = (app) => {
    const NAME_ACTION = "get_meal";
    const MEAL_ARGUMENT = "meal";
    const DATE_ARGUMENT = "date";

    let meal = app.getArgument(MEAL_ARGUMENT);
    let date = app.getArgument(DATE_ARGUMENT) ? new Date(app.getArgument(DATE_ARGUMENT)): new Date();
    let message = '';

    getMenuHTML(date).then((body) =>{
        if (!isMenuPresent(body)) {
            message = "I'm sorry, there doesn't seem to be a menu availible that day";
        } else if (hasNote(body)) {
            message = "There seems to be a note that day. I have provided a link to it in the Google Home App";
        } else {
            let menu = parseMeals(body, date);
            for(item of menu) {
                console.log(item.meal, meal);
                if (item.meal === meal ) {
                    message = `On ${ moment(date).format("dddd, MMMM Do")} there's ${item.items.join(",")}`;
                    break;
                }
            }
            console.log(message);
        }
        app.tell(message);
    })
}
After getting the arguments from Dialogflow, I get the menu for the day. I then check to see if there even is a menu that day. If there isn’t, I send a message stating that. Otherwise, I go on to check if there’s a note. If there is one, I send a message saying that since I haven’t figured out how to check for that. Otherwise, I try to get the menu for the requested meal.
Again, it mostly works, but I do wish I made parseMeals throw an exception so I could send an error message from that instead of letting it hang. It’s super fragile.
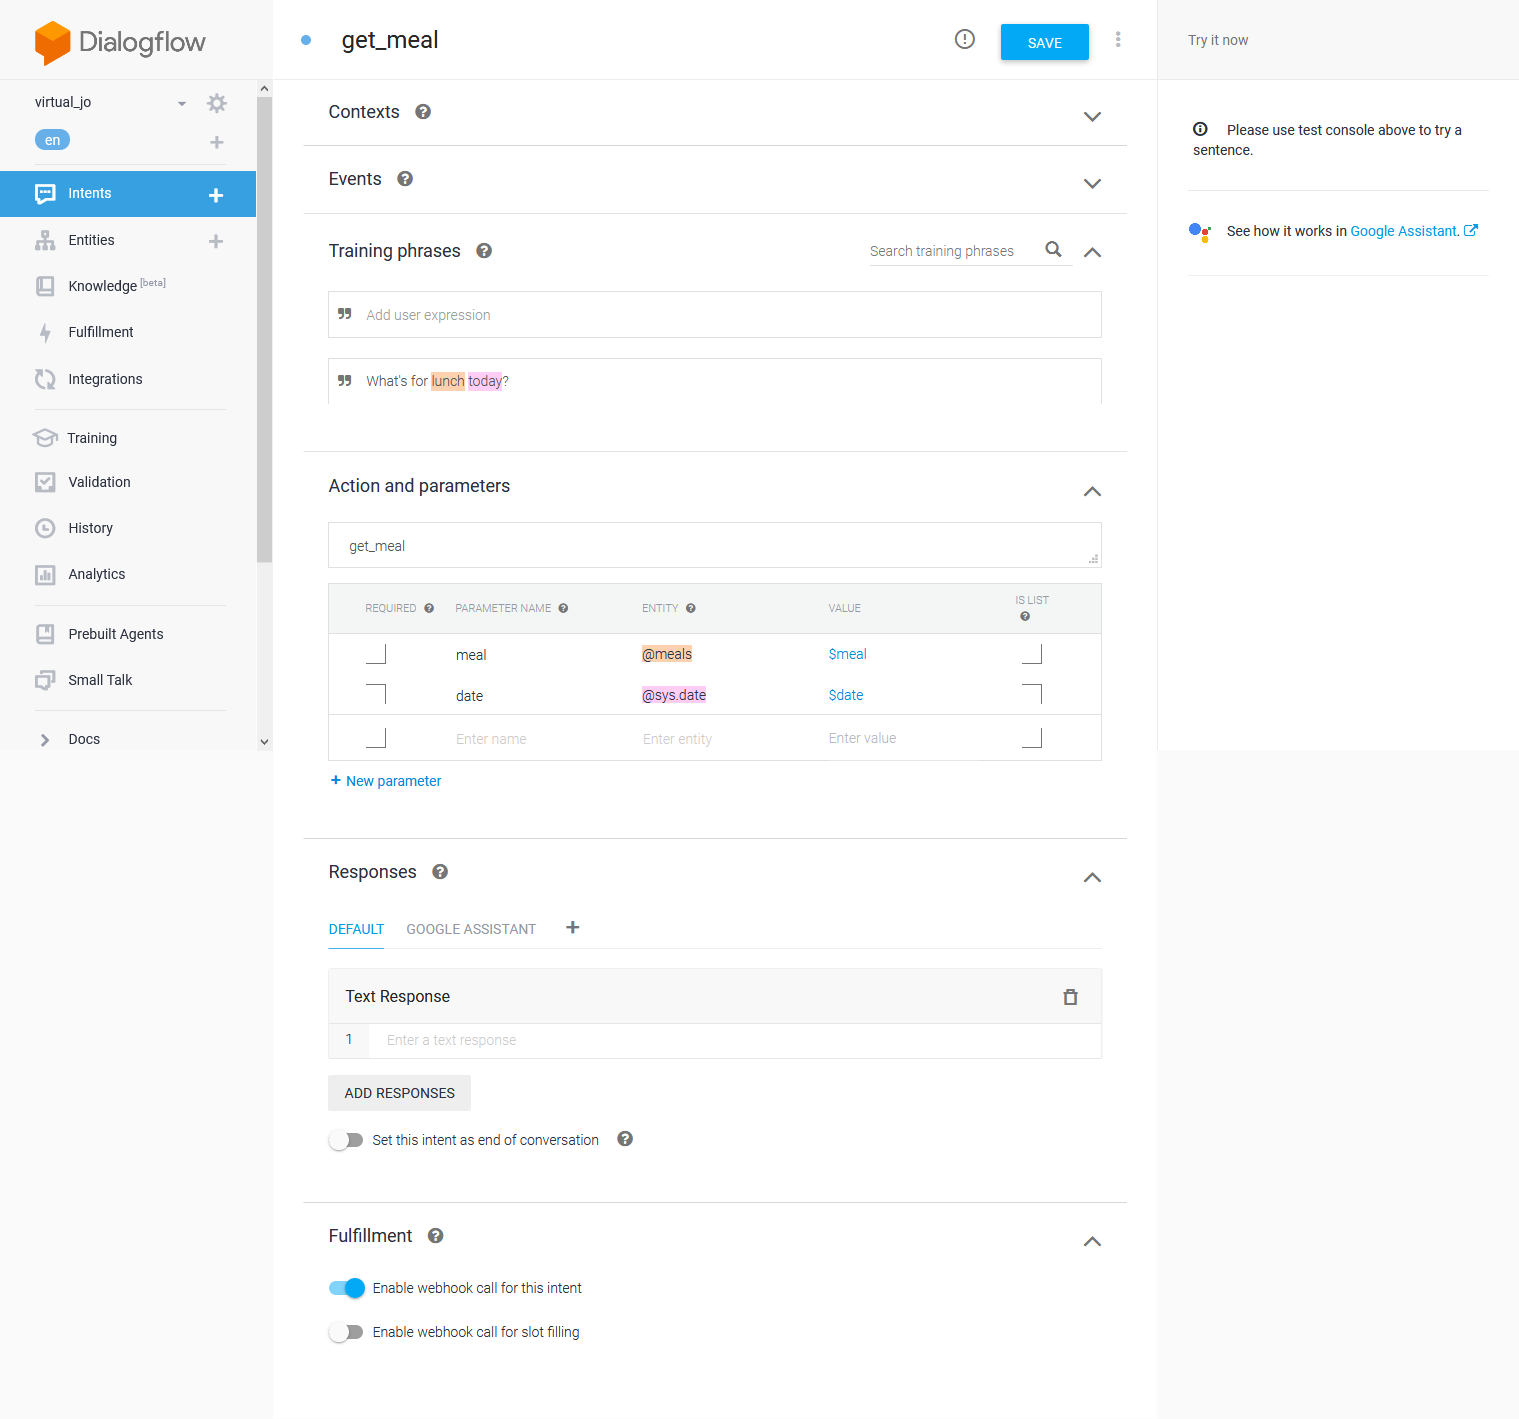
In Dialogflow, I set up the intent like this. The user can ask something like “What’s for <meal> <on_date>”, where <meal> and <on_date> are parameters.
<meal>is eitherbreakfast,lunchordinner<on_date>is something indicating a date. It can be a specific date or something which implies it likenext tuesdayortomorrow
Those parameters are tied to slots which Dialogflow extracts from the input to send to the backend.

The parsed query is then sent to the specified webhook, which I hosted on Google Cloud Functions. There, I decode the parsed query using the Actions on Google Client Library which I can then handle using the code above.
Finding When A Food Item Is Next Served
Having finished the get_meal intent, I shared what I did with the class. One classmate then asked if it was possible to check when a meal is next served, which it is!
The way I did this was to read through all the files containing menus starting from the requested date and checking if the food is mentioned in any of them.
function findNextServing(food) {
    return new Promise((resolve, reject) => {
        fs.readdir(MENU_PATH, (err, files) => {
            files = files.filter(file => path.extname(file) === ".html");
            if (err) {
                reject(err);
            };
            let nextServing;
            files.forEach((file) => {
                let date = moment(file.split('.')[0]);
                if (date.isSameOrAfter(moment())) {
                    fs.readFile(path.join(MENU_PATH, file), encoding="utf-8", (err, menu) => {
                        if (err) reject(err);
                        if (data.included(food)) {
                            resolve(date);
                        }
                    })
                }
            });
        });
    });
}
Looking back on this code, this isn’t a good approach. Since fs.readfile is asynchronous, there’s a chance that a race condition will pop up. This isn’t a problem for food items served every other week, but more frequent items would have problems.
As for getting Dialogflow to identify a food item, that needed some work. To do this, I had to:
- Download the menus
- Extract the food items from each menu
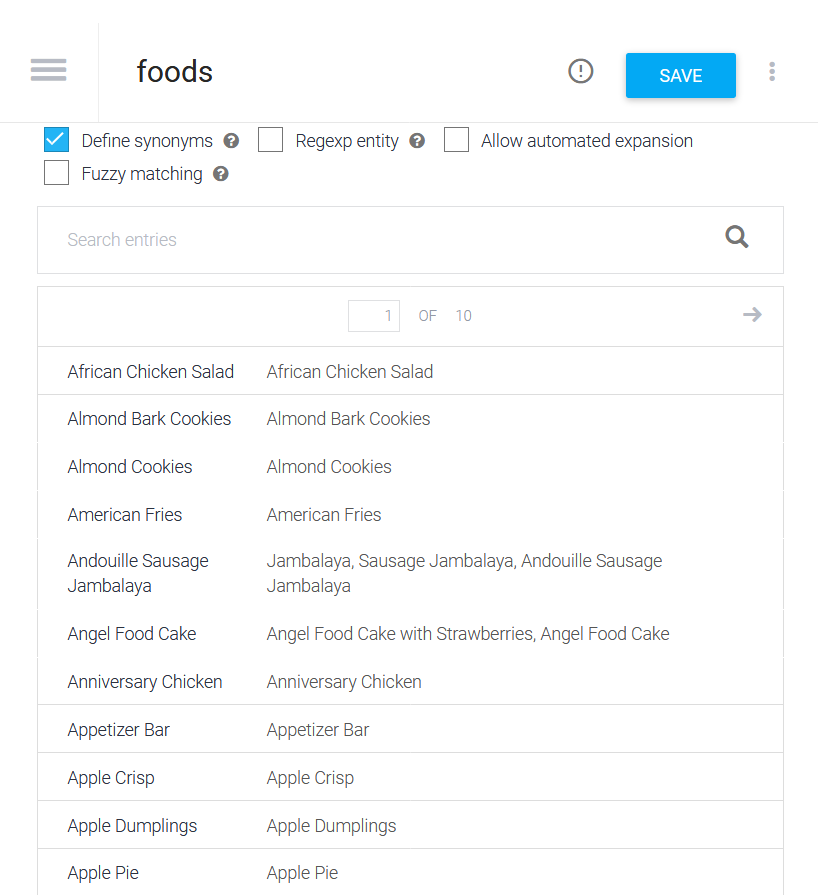
- Identify similar representations of a food item (e.g. Andouille Sausage Jambalaya can also be represented as Jambalaya or Sausage Jambalaya)
- Upload them to Dialogflow
Downloading the menus needs a bunch of HTTP requests.
As for extracting food items, I used grep.
$ grep -hoP '(?<=<li>).*?(?=</li>)' ./menu/* | sed "s/(RFH.*)$//g" |sort --unique > ../foods.txt
In short, I’m plucking out anything in an <li> tag (which is probably a menu item) using regex to parse HTML and stripping the unnecessary metadata from the output. I then remove the RHF identifier before sorting the food items, removing duplicates and saving it into a file called food.txt. I’m so proud of this I even wrote about it on one of my old blogs.
As for identifying similar representations, I did most of this manually which wasn’t as bad as it sounds. I mainly had to identify similar sounding foods and put them on the same line separated by a comma. After that, I made a script to prepend the food item into a CSV which I could then upload to Dialogflow as slots for the food entity. With that set up, a user can ask something like “when is Baked Ziti next served?” and be told when it would be next served.

Finding Courses

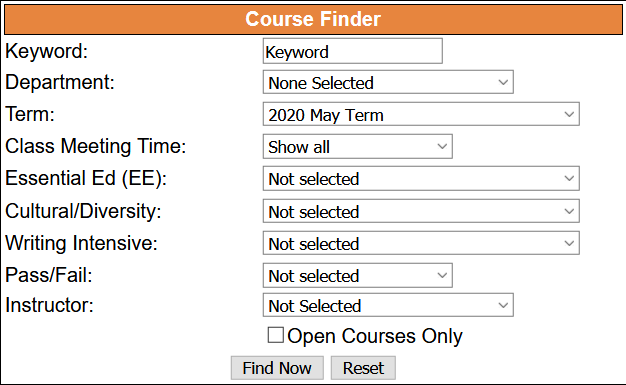
The other big feature this app had was the ability to search for college courses in the catalog. Much like the college cafeteria, there was no API, meaning that I would have to scrape the website. This one was much harder than the last one, however. At first, I thought it would be as easy as making a GET to the URL where the form is sent.
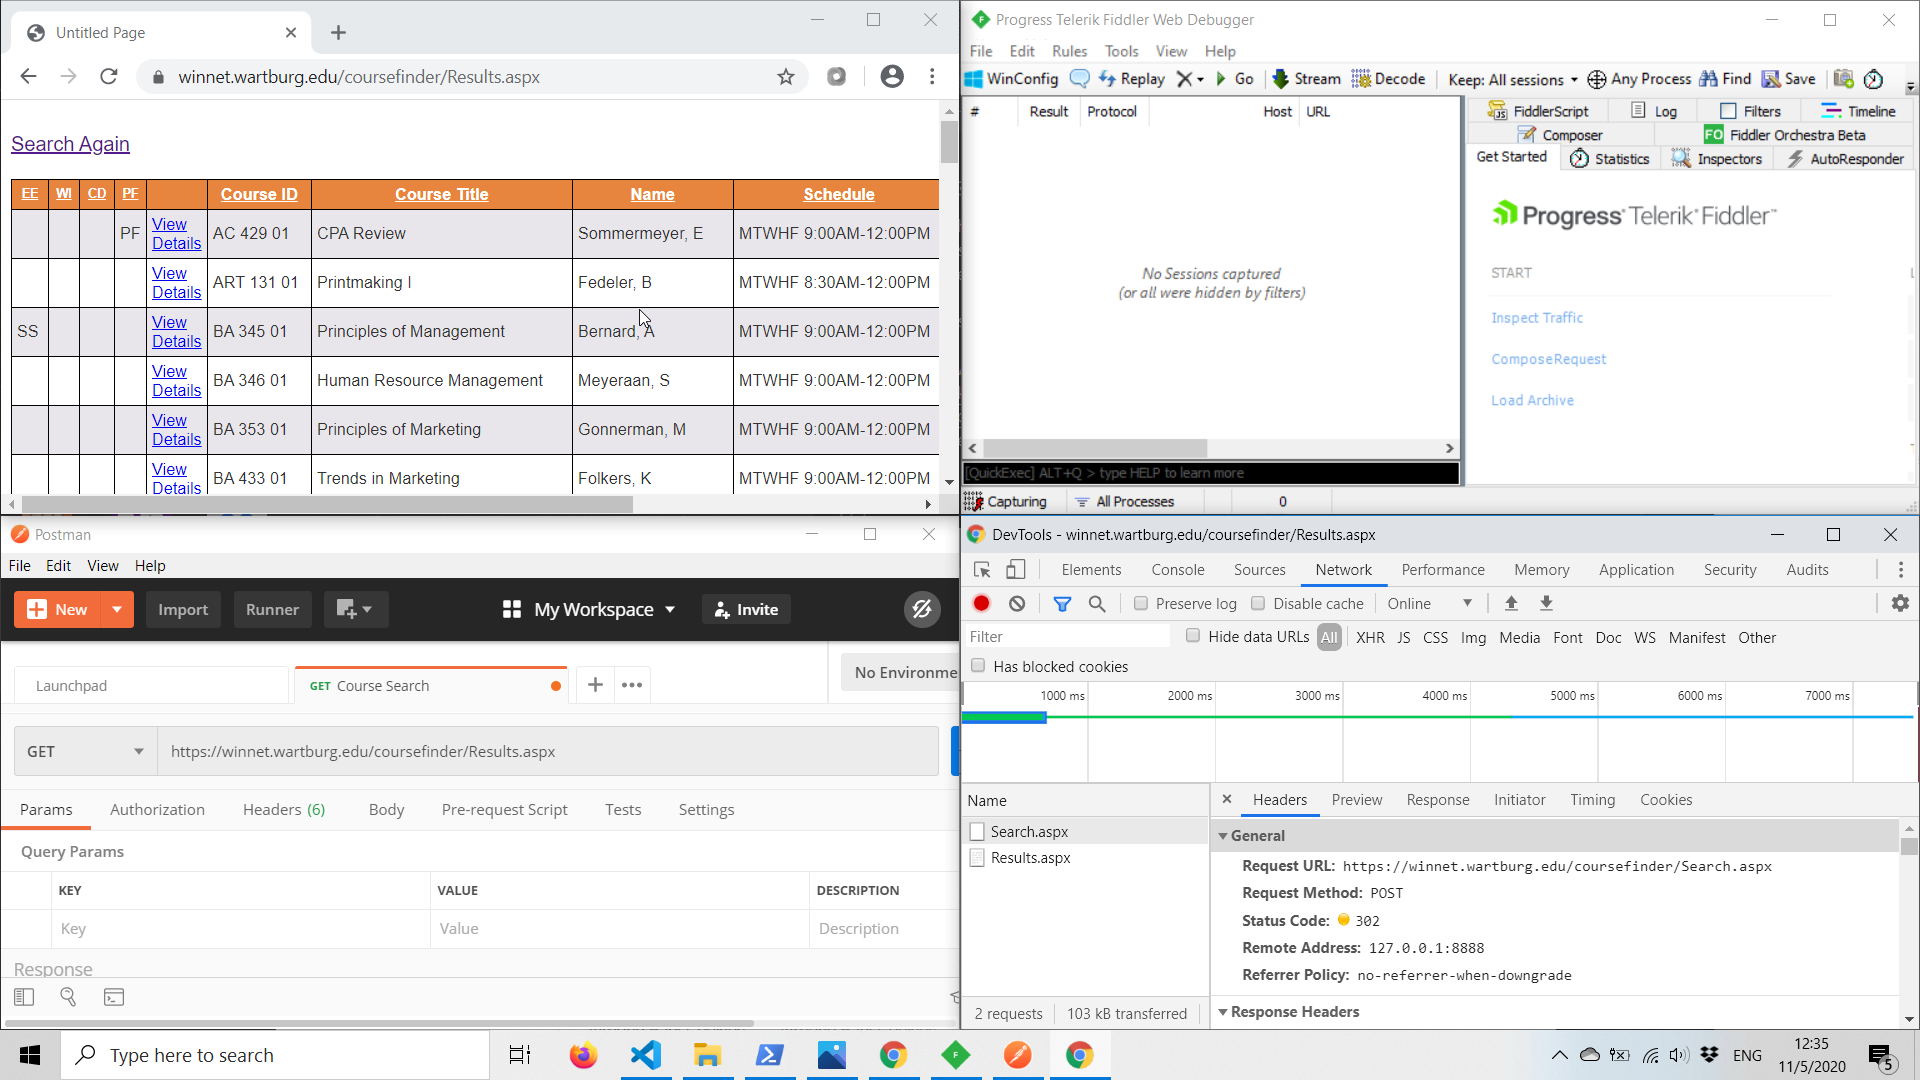
There was a lot more to that. With the help of Fiddler, Chrome Dev Tools and Postman, I discovered exactly what’s needed to submit the form successfully.

In short:
- Submitting the form required a cookie which you get when you load the page with the search form.
- The form comes with some fields which contain anti-forgery tokens which is probably meant to stop what I’m trying to do, and
- This took me a while to discover, but the search results can only be shown if there’s a referer header.
With all that, I could now make a search request. At this point, I decided to just pre-cache the course information to make things easier into a big JSON file that I would query. By the time I figured all this out, I didn’t have much time to build out the feature in the way I was hoping to. I could only provide a way to show how many courses are available in a department.
exports.handleFindCoursesIntent = (app) => {
  const NAME_ACTION = "find_courses";
  const DPT_ARGUMENT = "departments";

  let dpt = app.getArgument(DPT_ARGUMENT);

  if(dpt) {
    results = [];
    for (course of courses) {
        if (course.cid.id == id) {
            if (course.cid.dpt === dpt) {
                results.push(course);
            }
        }
    }
    app.tell(`There are ${ results.length } ${dpt} courses this semester.`)
  } else {
    app.tell(`THere are ${ courses.length } courses this semester.`);
  }
}
Also looking here, I’m not sure why I pushed things in array instead of a counter if I’m just giving a numerical result?
I also wanted to provide a summary on the classes which I was barely able to do by the time my project show case came up.
Looking Back
In all, while I didn’t accomplish everything I wanted to do, I’m proud of what I did. I learned a lot about Node.js and I built something people were impressed by. If I could do things differently, I would limit the project’s scope to just the cafeteria and manage my time better. Had I done those things; I think my project would be worthy of an A rather than the B I gave myself.
What’s Next?
I was proud of this project. So proud that I used this as one of my prime personal projects to show off on my resume. Looking at it though, I don’t think recruiters would find much to be impressed about. There isn’t an example showing how it works, especially since I deleted videos containing a demo. That’s why I’ve wanted to remake this project for a while, to put it in a place where I can show it off.
At first I tried to get it to a place where I can at least show something, but a lot of dependencies broke, the websites got harder to scrape and the Dialogflow API got deprecated, so I decided just to start all over again. Given the Covid-19 pandemic, I’m not sure I’ll be able to access the same data on the same website, so I’ll have to think of something.
I had a lot to learn about privacy then. ↩︎
That title goes to Trigger Warning. ↩︎
Since HTML is forgiving, browsers don’t blow up once they see it. ↩︎